Sales and invoices
Find any sale, open its invoice, send it to the customer, collect pending payments or void a sale made by mistake.
Every bill you create, whether from the POS, the back office or your online shop, lands on the Sales page. Open it from Sell → Sales. You need the sales.view permission.
#The sales list
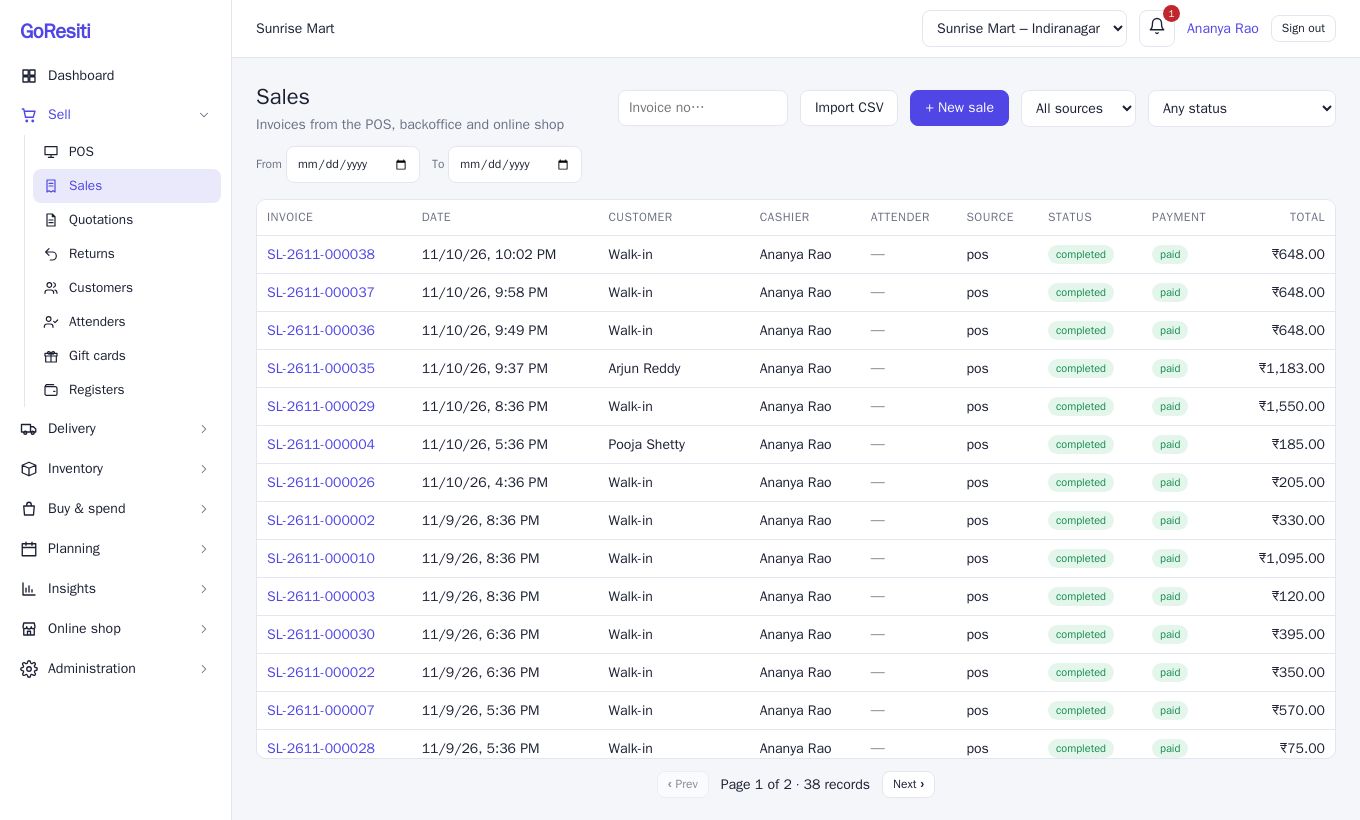
Each row shows the Invoice number, Date, Customer (Walk-in if none), Cashier, Attender, Source, Status, Payment status and Total. Click an invoice number to open the sale.
Narrow the list with the controls at the top:
- Invoice no… – type part of an invoice number and press Enter.
- All sources – POS, Backoffice, or Online shop (shown only if you use the online shop).
- Any status – Completed, Voided, Cancelled, or Pending online payment.
- From and To – a date range.
The list shows the store you have selected at the top of the screen.
#Statuses at a glance
| Status | Meaning |
|---|---|
| completed | The sale is final. |
| pending | An online order waiting for payment. |
| voided | The sale was cancelled; stock was put back. |
| cancelled | An online order that was cancelled. |
The Payment column shows paid, partial or unpaid.
#Create a sale from the back office
For phone orders, credit invoices or bills made after the fact, click + New sale (needs sales.create). Pick a customer, set the Invoice date, add items by typing a name or scanning a barcode, then add payments. Leave payments empty for a credit invoice. The window shows the Balance due as you go. No register session is needed here.
If you keep sales in a spreadsheet, Import CSV (shown on plans that include it) adds many sales at once, one row per item, and importing the same file twice does not create duplicates.
#The sale detail page
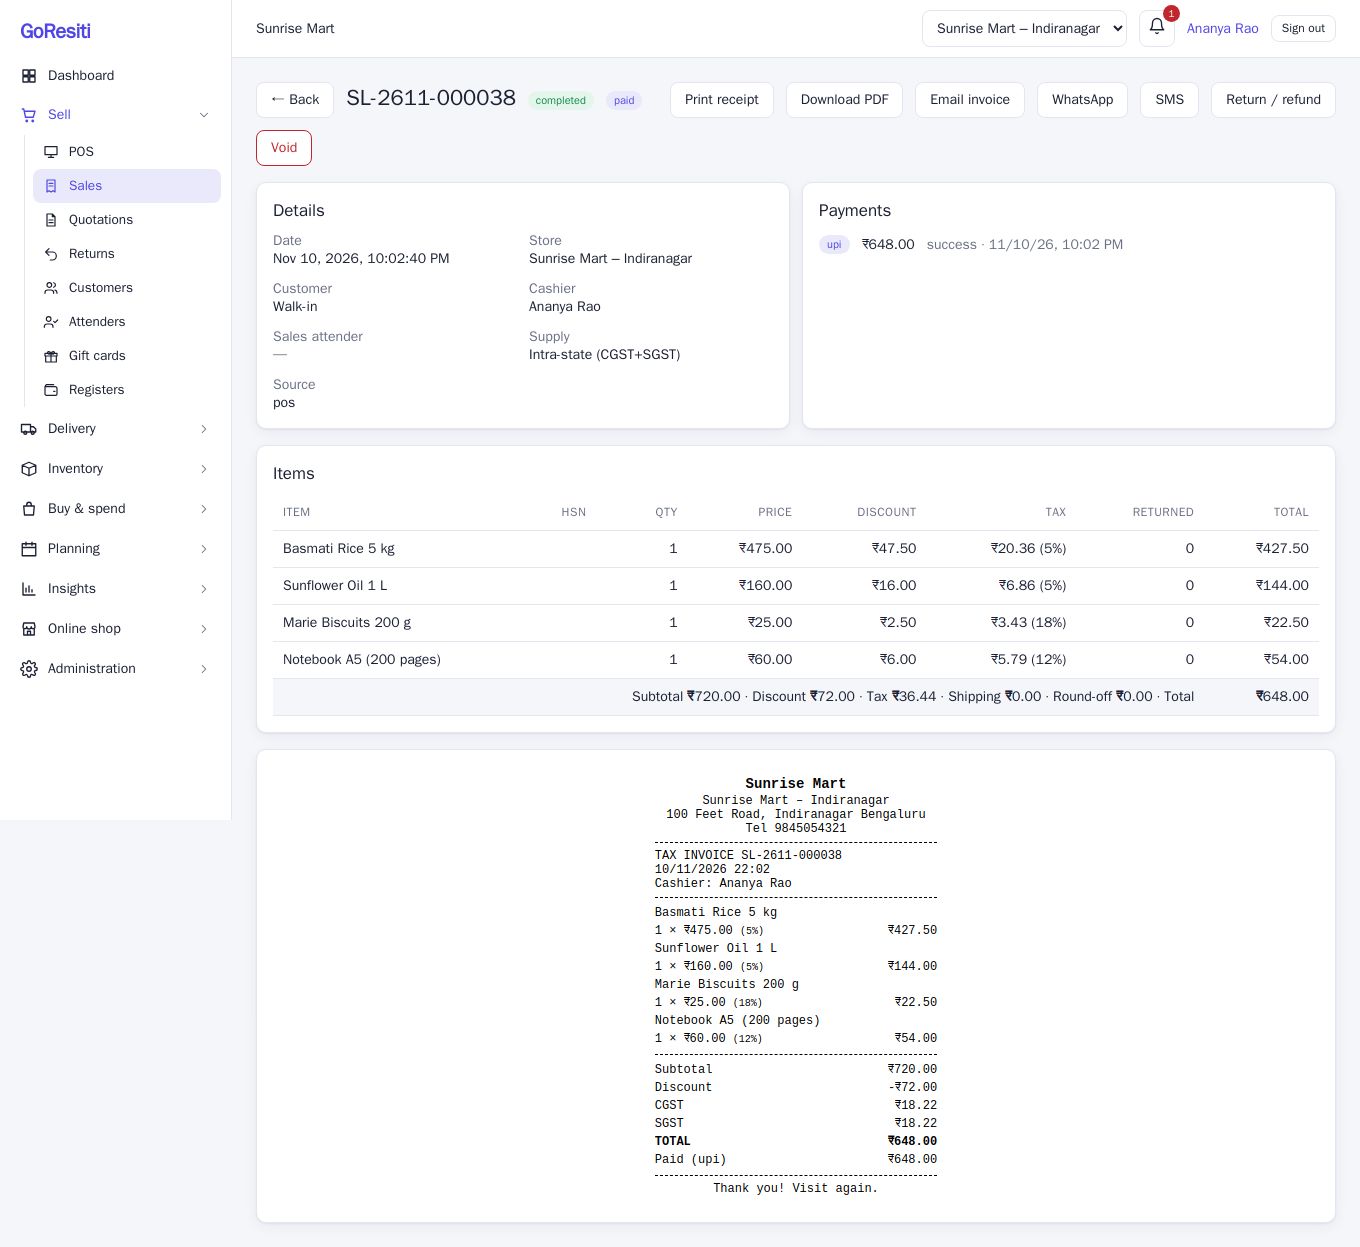
Click an invoice to see everything about it: date, store, customer, cashier, sales attender, whether it is intra-state (CGST + SGST) or inter-state (IGST), all payments, each item with HSN, quantity, price, discount, tax and what has been returned, and any delivery. A receipt preview sits at the bottom.
The buttons at the top depend on your plan and permissions:
| Button | What it does |
|---|---|
| Print receipt | Prints the receipt. |
| Download PDF | Saves the invoice as a PDF named after the invoice number. |
| Email invoice | Sends the invoice by email (Growth plan and above). |
| Sends it on WhatsApp (Growth plan and above). | |
| SMS | Sends an SMS (Business plan). |
| Return / refund | Starts a return (needs sales.refund; plan with returns). |
| Void | Cancels the sale (needs sales.void). |
#Send an invoice to the customer
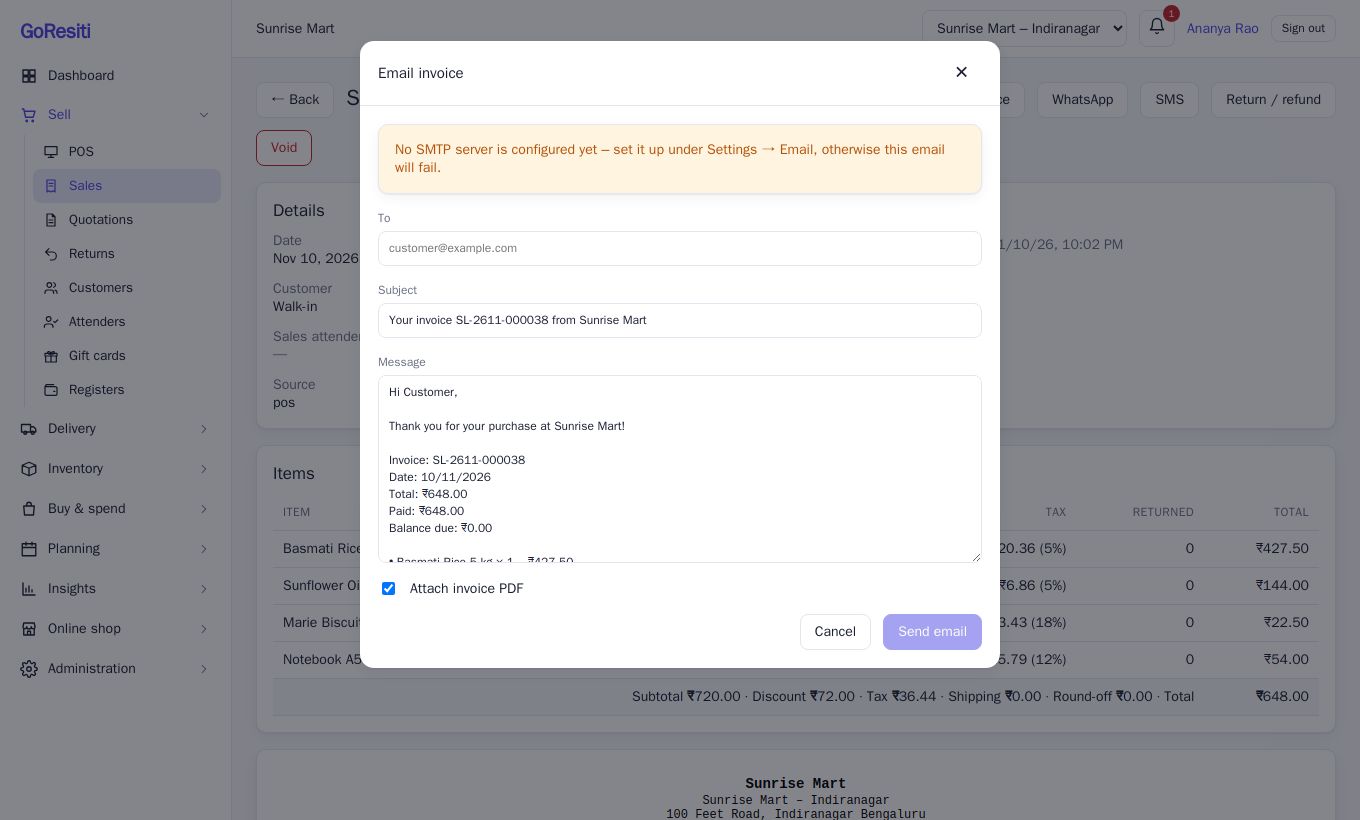
By email. Click Email invoice. The customer's email is filled in from their record and a subject and message are prepared from your template. Edit them if you like, leave Attach invoice PDF ticked, and click Send email. Email needs your mail settings first (Settings → Email); the window warns you if they are missing.
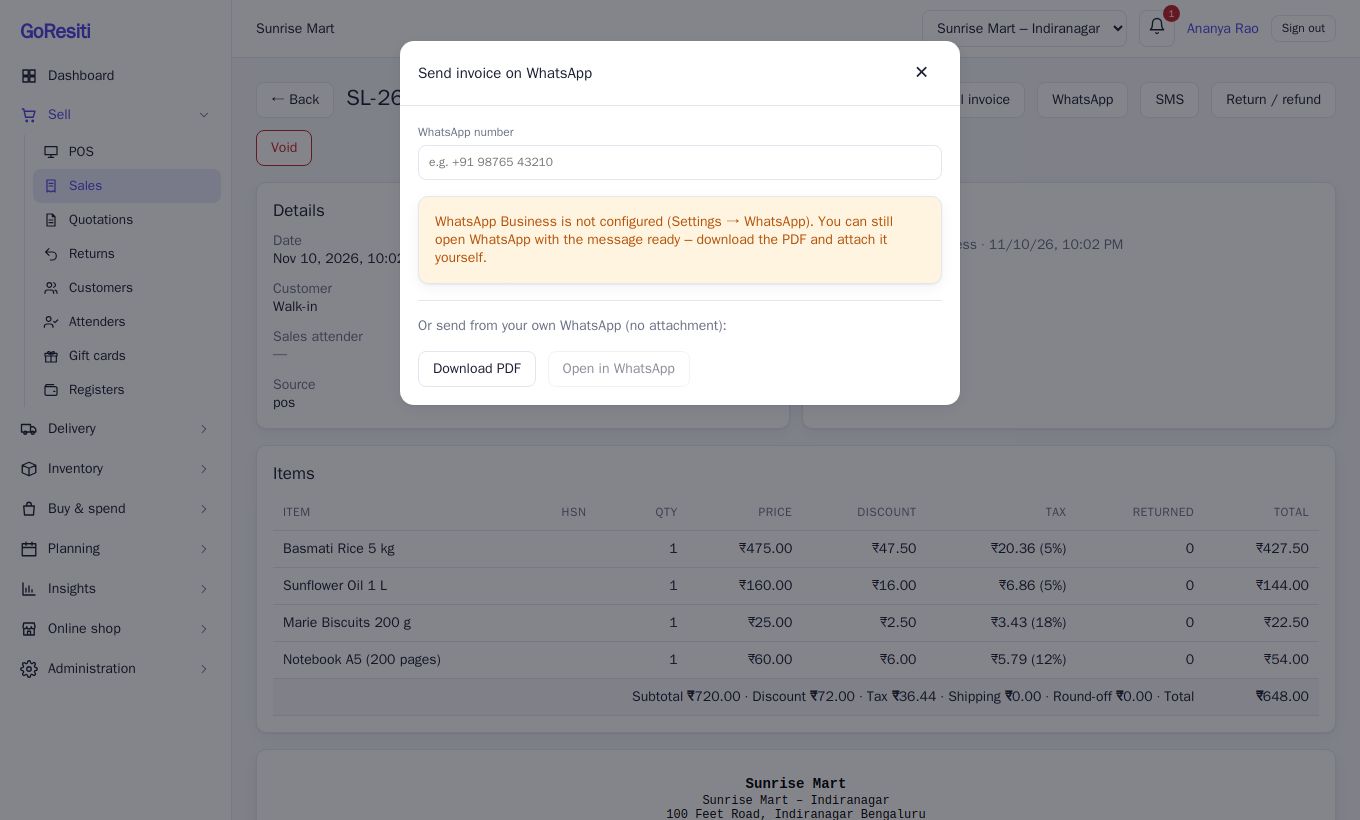
By WhatsApp. Click WhatsApp. The number comes from the customer record. If you have connected WhatsApp Business (Settings → WhatsApp), click Send on WhatsApp. If not, use Open in WhatsApp to open a ready message on your own phone or computer, then attach the downloaded PDF yourself.
By SMS. Click SMS and confirm the mobile number. It needs your SMS gateway to be set up (Settings → SMS).
If a message fails, the reason is shown and the attempt is kept in the matching log under Settings, so you can retry. Your owner can also switch on automatic sending after every sale in those settings. See the Settings guide and Plan and billing.
#Collect payment on a credit sale
A sale that is not fully paid shows partial or unpaid. On its detail page, in the Payments box, choose a method (cash, card, upi or bank), type the amount and click Collect. You can collect in several instalments until the balance is zero. A payment bigger than the amount due is rejected. Gift cards cannot be used this way, only at checkout. You need sales.create.
#Void a sale
Voiding cancels a completed sale that should never have happened, such as a wrong bill.
- Open the sale and click Void.
- Type a reason (at least three characters).
- Confirm.
What happens: the stock goes back, payments are cancelled, any gift card used is credited back, and loyalty points are reversed or restored. The sale stays in the list marked voided, with the reason.
Rules to remember:
- You need the sales.void permission.
- A sale cannot be voided once a return or refund exists on it.
- A voided sale cannot be voided again or brought back.
- Voiding does not refund a customer's UPI payment taken through the Cashfree QR. Refund that from your Cashfree dashboard.
Held and quotation entries are not posted sales, so they are deleted rather than voided.